

Views: 0 Author: Site Editor Publish Time: 2026-07-26 Origin: Site


Surface defects in manufactured plastic parts drive elevated scrap rates, compromise structural integrity, and cause rejected production runs. When producing hollow plastic parts, achieving a smooth, uniform surface dictates both aesthetic appeal and functional performance. Unplanned downtime spent diagnosing dull, pitted, or "orange peel" surfaces drains profitability. Without a systematic diagnostic framework, operators rely on trial-and-error parameter adjustments. This approach introduces secondary defects, extends cycle times, and causes catastrophic failures like parison blow-outs. Resolving these defects requires isolating variables across material handling, process parameters, and tooling condition. This guide provides a technical framework for diagnosing rough surfaces, preventing parison imperfections, and evaluating long-term corrective actions in extrusion blow molding. You will learn to isolate root causes systematically and apply targeted mechanical adjustments.
Defect Isolation is Sequential: Effective troubleshooting requires isolating material conditions (e.g., moisture, regrind contamination) before adjusting machine parameters or modifying tooling.
The Parison Predicts Part Quality: An imperfect parison—whether caused by melt fracture (sharkskin) or die-head build-up—cannot be fully corrected by blow pressure alone and inevitably yields surface roughness.
Temperature and Pressure Interdependencies: Minor deviations in melt temperature, localized mold "cold spots," or insufficient blow pressure frequently manifest as surface irregularities like "orange peel" or pitting.
Tooling Maintenance is Non-Negotiable: Degraded mold finishes, blocked venting systems, and dirty die heads are leading causes of trapped air and uneven surface textures, necessitating strict preventative maintenance and purging schedules.
Long-Term ROI: Investing in advanced material drying systems, automated purging protocols, or tooling refurbishment yields a higher return on investment than continuous manual process compensation.
Establishing the baseline for acceptable part quality is the first step in troubleshooting. You must define the threshold between acceptable cosmetic imperfections and functional failures. A minor surface blemish might pass inspection on a consumer detergent bottle but will cause a catastrophic failure in a pressurized industrial container. Functional failures often manifest as compromised barrier properties, stress concentrators, or severe wall-thinning. Operators must distinguish between a mold-replicated texture and a process-induced defect.
When evaluating surface irregularities, visual inspection alone is rarely sufficient. Quality control teams should utilize surface roughness testers (profilometers) to quantify the exact deviation from the mold finish. This data provides a measurable baseline to determine if parameter adjustments are actually improving the surface or merely shifting the defect to another area of the part.
Different surface defects point to entirely different root causes within the extrusion and blowing phases. Recognizing the specific physical signature of the defect accelerates the diagnostic process.
Defect Type | Visual Signature | Primary Root Cause Category | Functional Impact |
|---|---|---|---|
Orange Peel | Rippled, dimpled texture resembling citrus skin | Melt/Mold Temperature Discrepancy | Poor label adhesion, aesthetic rejection |
Pitting & Voids | Small craters or surface blisters | Trapped Moisture or Volatile Gases | Stress concentrators, compromised barrier |
Dullness | Uniform lack of surface gloss | Low Blow Pressure or Mold Wear | Aesthetic rejection |
Die Lines | Continuous linear streaks along the parison axis | Die Head Scoring or Degraded Resin | Wall thinning along the streak line |
Frost Marks | Localized dull or rough patches | Uneven Mold Cooling (Cold Spots) | Premature shrinkage, dimensional instability |
Blow-outs represent the most severe manifestation of surface defects. These catastrophic ruptures in the part wall during expansion often originate at localized weak points caused by deep pits or severe surface voids. When a blow-out occurs, the machine must be stopped immediately to clear the blown plastic from the mold cavity, resulting in significant production delays.
Material conditions dictate the final surface quality before the resin even enters the extruder feed throat. If the raw polymer is compromised, no amount of downstream parameter manipulation will yield a perfect part.
Hygroscopic resins, such as PETG, nylon, and polycarbonate, actively absorb moisture from the ambient environment. Even non-hygroscopic materials like HDPE can carry surface moisture if stored in humid conditions or subjected to rapid temperature changes that cause condensation. During extrusion, this trapped moisture is subjected to high heat and pressure inside the barrel. As the melt exits the die head, the sudden drop in pressure causes the superheated moisture to flash into steam.
These microscopic steam bubbles burst upon exiting the die, creating surface blowouts, pitting, or a generally rough texture on the parison. Assessing the capacity and dew-point performance of current desiccant drying equipment is essential. The dryer must maintain a dew point of at least -40°F (-40°C) to ensure the resin is adequately dried before processing. Operators should regularly verify the moisture content of the resin using a moisture analyzer just before it enters the feed throat.
Integrating regrind into the production process is standard practice for material efficiency, but it introduces significant variables. Inconsistent regrind particle size alters the bulk density of the feed, causing surging in the extruder. This surging leads to uneven melt pressure and inconsistent parison formation. Furthermore, high percentages of recycled material often contain polymer chains that have been degraded by multiple heat histories.
Degraded polymer flows differently than virgin resin, altering the melt flow dynamics and leading to physical surface defects. Establishing strict blending ratios is a necessary risk mitigation strategy. Most processes cap regrind at 15% to 25% to maintain process stability. Implementing screen packs behind the breaker plate is also critical to filter out unmelted particles, degraded material, and foreign contaminants before they reach the die head.
Cross-contamination of incompatible resins causes localized surface blemishes. If a machine transitions from a high-temperature resin to a low-temperature resin without proper cleaning, the residual high-temp material will not melt fully, appearing as hard, rough lumps in the final part. Dust, cardboard fibers from gaylords, and old resin degraded inside the barrel also contribute to surface imperfections.
Implementing standard purging procedures using specialized purging compounds helps clear carbonized build-up before production runs. Mechanical purging compounds physically scrub the barrel and screw, while chemical purging compounds break down the polymer bonds of degraded resin. A strict preventative maintenance schedule that includes pulling and manually cleaning the screw is required for long-term stability.
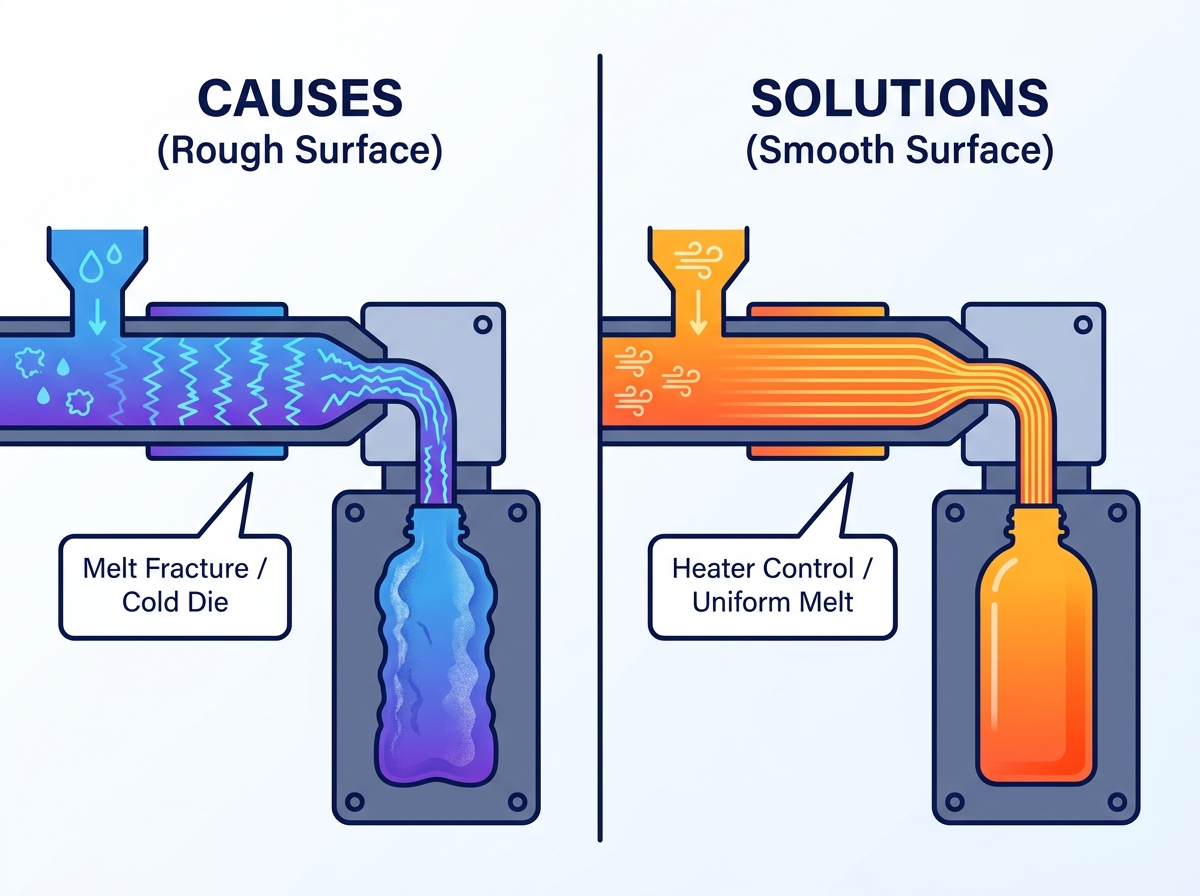
Machine settings directly influence how the polymer behaves during extrusion and blowing. Operators must balance temperatures, pressures, and timing to achieve optimal surface replication.
The melt temperature dictates the viscosity of the polymer. A melt temperature that is too low results in a highly viscous material that resists stretching. When this stiff parison is blown against the mold wall, it fails to replicate the microscopic details of the mold surface, causing an orange peel effect. The material essentially freezes before it can flatten out completely.
Conversely, a temperature that is too high causes material degradation, outgassing, and streaking. While increasing melt temperature improves surface finish by lowering viscosity, it extends cooling time. The part must remain in the mold longer to solidify, negatively impacting overall cycle time. Operators must find the precise temperature window that allows for adequate surface replication without unnecessarily extending the cooling phase.
High shear stress at the die exit causes melt fracture, commonly known as sharkskin. As the polymer flows through the narrow gap between the die pin and bushing, the material near the walls experiences extreme shear forces. If the extrusion speed exceeds the critical shear rate of the polymer, the surface of the melt tears as it exits the die. This produces a parison with an inherently rough, matte texture that persists even after high-pressure blowing.
Die head tooling condition heavily affects the parison. Old resin stuck in the die head or scoring on the tooling creates continuous die lines. These lines manifest as longitudinal surface roughness and localized wall thinning. Regular inspection of the die pin and bushing for wear, nicks, and carbon build-up is mandatory. Polishing the tooling can temporarily resolve die lines, but severely scored components must be replaced.
Blow pressure provides the mechanical force required to push the parison against the mold cavity. Insufficient blow pressure fails to force the polymer firmly against the metal walls, resulting in a dull or uneven finish. The plastic simply does not make intimate contact with the mold, preventing it from picking up the polished or textured surface.
Pre-blow timing also impacts quality. Pre-blow introduces a small amount of air into the parison before the mold fully closes, preventing the parison from collapsing on itself. If the parison expands too early, it can drag against the closing mold halves, causing surface scuffing. If it expands too late, the parison may fold or suffer localized thinning. Precise timing synchronization between the mold closing sequence and the blow air valves is critical.
The condition of the mold and tooling directly dictates the final part finish. The extruded part acts as a direct mirror of the mold cavity.
Abrasive wear, corrosion, or inadequate polishing of the mold directly translates to a rough product surface. Molds running glass-filled or heavily pigmented resins experience accelerated wear. Over time, the polished surface degrades, leaving a dull finish on the molded parts. Water leaks from cooling channels can cause localized rust and pitting on the cavity surface.
Regular inspection and maintenance of the mold cavity are required. Operators should clean the mold surfaces with approved solvents to remove off-gassing residue and mold release agents. Depending on the production volume, molds require periodic re-polishing or re-texturing by specialized tooling technicians to restore the original finish.
During the blowing phase, the expanding parison displaces the air inside the mold cavity. If this air cannot escape quickly enough, it forms a pressurized barrier between the polymer and the mold. This trapped air prevents the plastic from touching the mold wall, causing pitting, bubbles, and dull spots. In severe cases, trapped air causes diesel ignition (dieseling), where the compressed air heats up enough to burn the plastic, leaving black, carbonized marks on the surface.
Assessing current venting configurations is crucial for proper air evacuation. Molds utilize parting line vents, vent pins, and porous metal inserts to allow air to escape while containing the viscous plastic. Vents must be cleaned regularly, as they easily become clogged with off-gassed volatiles, dust, and microscopic plastic flakes. If a mold consistently produces parts with trapped air defects despite clean vents, the venting channels may need to be deepened or widened by a toolmaker.
Mold temperature controls the rate of polymer solidification. A mold that is too cold freezes the material immediately upon contact, before it completely conforms to the cavity. This rapid freezing locks in surface stresses and prevents the plastic from flowing into the microscopic crevices of the mold finish, resulting in a dull appearance.
Uneven cooling creates mold "cold spots." These are often caused by clogged cooling channels, poor channel design, or inadequate water flow. Cold spots lead to localized surface distortion, frosting, and premature shrinkage. The plastic in the cold spot shrinks faster than the surrounding material, pulling away from the mold wall and creating a rough patch. Regular descaling of the mold cooling channels and verifying flow rates with inline flow meters ensures uniform temperature distribution.
Implementing a structured approach to troubleshooting minimizes downtime and prevents secondary defects. Randomly changing parameters without a logical sequence leads to process instability.
Train operators to inspect the parison before inflation. This isolates extrusion defects from mold-related defects. If the parison is rough as it hangs from the die head, the issue lies in the material, extruder, or die head. If the parison is smooth but the blown part is rough, the issue lies in the blowing process or the mold. Document the exact location and repeatability of the surface defect to identify patterns. A defect that appears in the exact same spot on every part points to a mold issue, while a random defect points to material or process variations.
Utilize a strict decision tree to narrow down the root cause. Do not skip steps.
Check material conditions: Verify moisture content, regrind ratios, and check for contamination in the hopper.
Check parison quality: Look for continuous die lines, melt fracture (sharkskin), or surging.
Check process parameters: Verify melt temperatures, extruder RPM, blow pressures, and timing sequences against the standard setup sheet.
Check tooling: Inspect mold vents for blockages, check cavity finish for wear, and verify cooling water flow and temperatures.
Adjust parameters from least to most disruptive. Wait for the process to stabilize after each adjustment before making another change.
Increase blow pressure and adjust pre-blow timing to ensure the material is forced against the mold wall.
Adjust mold and melt temperatures incrementally (typically in 5-degree steps) to optimize material flow and cooling.
Purge the extruder and die head with a commercial purging compound to remove degraded material and carbon build-up.
Pull and clean the die head tooling (pin and bushing) to remove scoring and stubborn resin deposits.
Pull the mold from the machine for comprehensive venting maintenance, cooling channel descaling, or surface polishing.
Establish protocols for quality control testing post-adjustment. Ensure the fix is stable over a sustained production run. Verify that the adjustment hasn't introduced secondary dimensional defects, wall-thickness variations, or extended cycle times. A fix that smooths the surface but causes the part to fail drop testing is not a viable solution.
Sustainable quality requires looking beyond immediate parameter adjustments. Chronic surface defects often indicate that the equipment has reached its operational limits.
Evaluate the return on investment for closed-loop gravimetric blenders and advanced desiccant dryers. Gravimetric blenders weigh each material component precisely, eliminating the volumetric variations that cause extruder surging and inconsistent parison formation. Advanced desiccant dryers with closed-loop dew point monitoring ensure that hygroscopic resins are perfectly dried, completely eliminating moisture-related pitting and blow-outs. These systems provide consistent material input, which is the foundation of stable surface quality.
Compare the downtime and cost of re-polishing and re-venting existing molds versus investing in new tooling. Molds have a finite lifespan. Repeated polishing alters the cavity dimensions, eventually leading to parts that are out of tolerance. Upgraded tooling often incorporates conformal cooling channels, which provide vastly superior temperature control compared to traditional straight-drilled channels. Better cooling eliminates cold spots, reduces cycle times, and improves overall surface finish. When existing molds require constant maintenance to produce acceptable parts, replacement is usually the most cost-effective long-term strategy.
Resolving rough and uneven surfaces requires a disciplined, mechanical approach to process control. By systematically isolating material, machine, and tooling variables, operators can eliminate defects without introducing new production issues. Implement the following actionable steps to stabilize your production runs:
Audit your material handling system immediately to verify dryer dew points and enforce strict regrind blending ratios.
Implement a mandatory daily inspection of the parison prior to mold closing to catch melt fracture and die lines early.
Establish a preventative maintenance schedule for mold venting and cooling channel descaling to prevent trapped air and cold spots.
Standardize your purging protocols using commercial purging compounds during every material or color changeover.
Contact our technical team via our support portal to evaluate your current tooling and discuss advanced cooling upgrades.
A: Orange peel is typically caused by melt or mold temperatures that are too low, preventing the plastic from fully replicating the mold surface. It can also result from insufficient blow pressure failing to force the viscous material against the cavity walls.
A: Prevent die lines by regularly purging the extruder to remove degraded resin. You must also pull and clean the die head tooling, specifically the pin and bushing, to eliminate scoring, nicks, or hard carbon build-up.
A: Bubbles often indicate trapped moisture in the resin, which vaporizes into steam during extrusion. Ensure your desiccant drying equipment is functioning correctly, maintaining a proper dew point, and the resin is adequately dried before processing.
A: Inadequate venting traps displaced air between the expanding parison and the mold cavity. This creates a pressurized barrier that leads to pitting, dull spots, incomplete surface replication, and occasionally dieseling (burn marks).
A: Inconsistent regrind particle size causes extruder surging, while degraded recycled material alters melt flow dynamics. This combination causes uneven parison formation and physical surface defects like streaking, roughness, and localized thinning.
A: Localized dull patches, known as cold spots, are caused by uneven mold cooling. Clogged cooling channels or poor water flow freeze the material prematurely before it fully conforms to the cavity finish.
A: Consider upgrading when existing molds show significant wear, require frequent re-polishing, or fail to vent properly. New tooling with conformal cooling can significantly reduce cycle times, eliminate cold spots, and improve surface finish.