
Views: 0 Author: Site Editor Publish Time: 2026-07-07 Origin: Site


Die head contamination directly impacts your bottom line. Black specks, color streaks, and degraded materials inflate scrap rates and erode profit margins rapidly. Maintaining die heads in continuous production environments creates significant operational friction. Plant managers constantly balance necessary maintenance downtime against strict production quotas. Improper cleaning leads to scored tooling, recurring contamination, and catastrophic equipment failure. You need a standardized cleaning protocol to protect your machinery. This guide evaluates three distinct, industry-standard methods for cleaning die heads. We cover preventative in-machine purging, manual teardowns, and complete thermal overhauls. You will learn how to optimize maintenance schedules, protect your tooling, and drastically reduce total downtime without compromising part quality.
Preventative vs. Reactive Maintenance: In-machine purging compounds are highly effective for routine color and material changes, significantly reducing the need for full machine teardowns.
Tooling Protection is Paramount: Manual teardowns require strict adherence to using non-ferrous tools (brass, copper) to prevent scoring the die head's polished steel surfaces, which would otherwise cause permanent flow defects.
Advanced Recovery for Severe Buildup: Thermal cleaning methods (fluidized beds, ovens, salt baths) offer the most thorough carbon removal for heavily degraded accumulator heads but require strict temperature control to prevent metallurgical damage.
Strategic Method Selection: The optimal cleaning strategy relies on a hybrid approach, balancing the frequency of material changeovers against the severity of polymer carbonization.
A clean die head is essential for profitable production outcomes. Success means zero visual defects in the final product. It requires a consistent parison drop and uniform wall thickness across every cycle. When polymer degrades inside the tooling, these parameters fail immediately. Contamination disrupts the smooth flow of molten plastic. This disruption compromises the structural integrity of the molded part, leading to weak weld lines and uneven material distribution.
Physical indicators of a contaminated head are easy to spot on the shop floor. Operators will notice die lines running vertically down the parison. Color hang-up occurs when previous pigments bleed into new production runs, sometimes hours after a changeover. You will also see gels and carbonized black specks embedded in the extruded plastic. These defects render parts unusable and force immediate quality control rejections. Ignoring these signs guarantees a spike in your scrap rate.
You must differentiate head contamination from mold defects before tearing down equipment. Actual die-lip lines stem from head contamination or scored tooling. Mold venting issues present similar visual flaws but require different solutions. Blocked mold vents trap air, causing surface blemishes that mimic flow lines. You fix venting issues by cleaning the mold vents or sandblasting the mold cavities. You do not need a die head teardown for venting problems.
Defect Type | Visual Indicator | Root Cause | Required Action |
|---|---|---|---|
Die Lines | Continuous vertical scratches on the parison | Carbon buildup or scored die lip | Die head cleaning or repolishing |
Black Specks | Dark, hard particles embedded in the plastic | Degraded, carbonized polymer flaking off | Purging or manual teardown |
Trapped Air Marks | Cloudy patches or shallow surface indentations | Clogged mold vents preventing air escape | Clean mold vents (No die head action) |
Color Streaks | Swirls of previous resin color in new parts | Dead zones in the flow channel holding old resin | Chemical purging compound application |
Poor maintenance carries a severe financial burden. Scheduled maintenance downtime is a controlled, predictable expense that you can build into your production calendar. High scrap rates and wasted resin compound rapidly, destroying profit margins. Emergency teardowns halt production unexpectedly and incur massive labor costs. Implementing a proactive cleaning strategy mitigates these financial risks entirely. When you maintain a clean flow channel, you maximize machine uptime and ensure every ounce of resin translates into a sellable product.
Strict safety requirements are non-negotiable before applying any cleaning method. Die heads operate at extreme temperatures and high pressures. Molten polymer causes severe burns instantly upon contact. You must establish rigorous safety protocols to protect your maintenance technicians. Rushing the preparation phase often leads to severe workplace injuries and damaged equipment.
Safely halting production requires a methodical step-by-step process. You cannot simply turn off the power and walk away. The machine must be systematically depressurized and cleared of active material.
Disconnect or shut off all auxiliary feeding equipment to stop the flow of raw resin to the hopper.
Purge all residual resin from the barrel using a high-melt-flow transition resin if necessary.
Back off the extruder screw to relieve internal pressure completely.
Execute standard lock-out/tag-out (LOTO) procedures to isolate the machine from its electrical and pneumatic power sources.
Verify zero energy state before allowing any technician to approach the die head with tools.
Temperature management is critical during the shutdown phase. Technicians must wear required personal protective equipment at all times. This includes heavy-duty thermal gloves, full face shields, and heat-resistant Kevlar sleeves. You must manage cooling cycles carefully. Do not induce thermal shock in the heavy steel tooling. Rapid cooling causes the metal to warp or crack irreparably. Allow the die head to cool at a controlled rate, often utilizing the machine's internal cooling fans before applying any external cooling methods.
Staging the work area is just as important as shutting down the machine. Clear the floor of any tripping hazards. Lay down high-temperature rubber mats to protect components that will be removed. Ensure overhead hoists are inspected and rated for the weight of the accumulator head. Preparation prevents accidents and ensures the actual cleaning process proceeds without interruption.
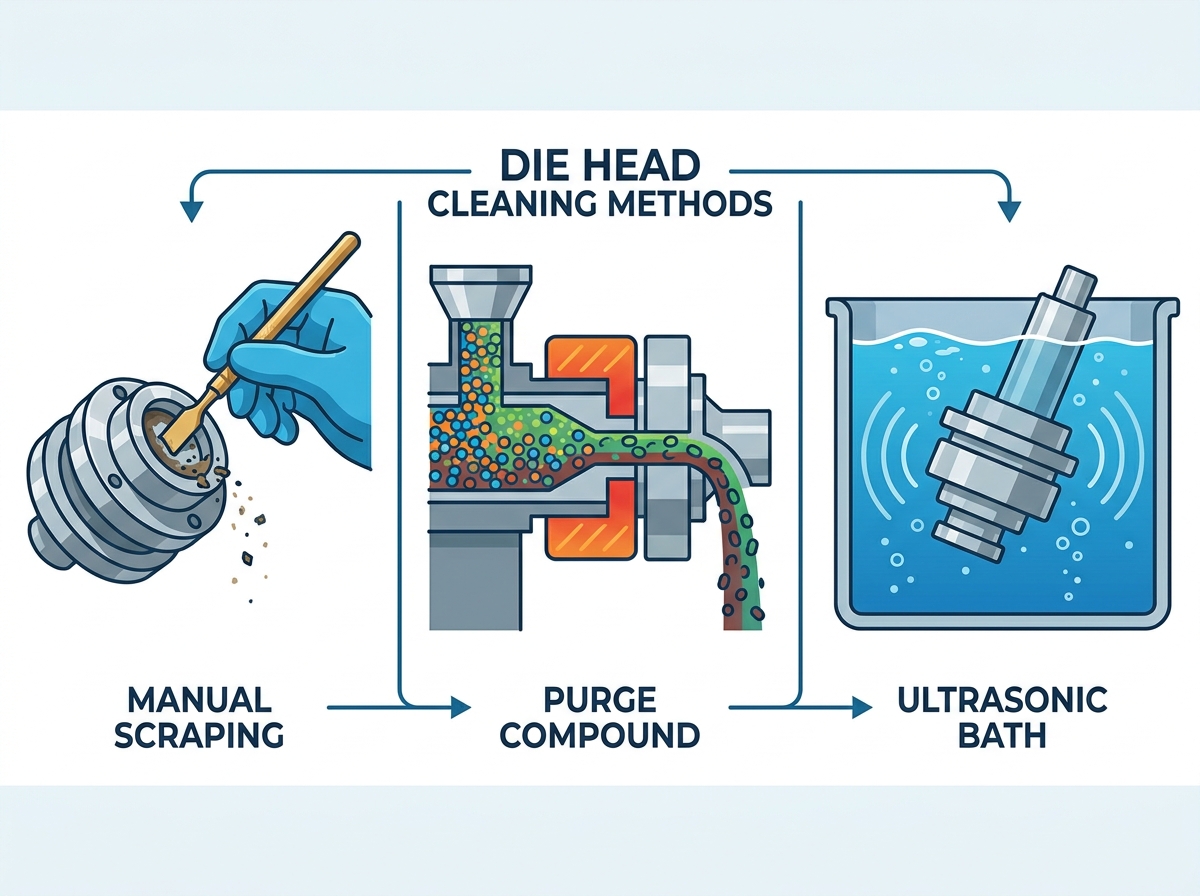
In-machine cleaning serves as preventative and transitional maintenance. You perform this without disassembling the equipment. Commercial purging compounds work chemically or mechanically within extrusion blow molding machinery. Mechanical purges use high-viscosity carriers to scrub the internal surfaces physically. They rely on shear force to push out degraded material. Chemical purges alter polymer viscosity and break down stubborn carbon bonds at a molecular level. They require a specific soak time to activate their foaming or expanding agents.
Purge Type | Mechanism of Action | Best Application | Limitations |
|---|---|---|---|
Mechanical | High shear force and physical scrubbing | Rapid color changes, removing loose carbon | Cannot reach tight dead zones or complex geometries |
Chemical | Molecular breakdown and foaming expansion | Deep cleaning, removing baked-on colorants | Requires soak time, extending the changeover duration |
Hybrid | Combines chemical expansion with mechanical scrubbing | Heavy contamination in older machines | Higher cost per pound than standard compounds |
Transition purging differs significantly from shutdown purging. You run an on-the-fly transition purge for rapid color or resin changes. This keeps the machine running and minimizes downtime. A shutdown purge involves leaving a heat-stable compound in the head during idle periods. This seals out oxygen and prevents residual polymer from carbonizing while the machine cools over a weekend or holiday.
This method offers exceptional speed and efficiency. It is superior for rapid color changes and minor carbon mitigation. However, it has limitations against severe, baked-on carbon buildup. Purging compounds cannot restore a heavily degraded accumulator head that has been neglected for months. You must evaluate the severity of the contamination before relying solely on this preventative method. If black specks persist after three purge cycles, you need a more aggressive approach.
Residue from the purging compound can remain in the die head. You mitigate this risk by matching the compound's properties to your production resin. Ensure the temperature window and melt flow index (MFI) align perfectly. Establish a standardized purging sequence for operators to follow. Consistent execution prevents residue from contaminating the next production run. Always follow the purge manufacturer's guidelines regarding screw speed and back pressure to maximize the compound's effectiveness.
Manual teardowns provide scheduled deep maintenance and localized carbon removal. The disassembly process requires careful mechanical steps. First, safely drop the head using appropriate lifting equipment. Disconnect all heating bands and thermocouple sensors. Carefully remove the die ring, the mandrel, and the internal flow channels. This exposes the internal surfaces for thorough inspection. You must document the position of every bolt and seal to ensure accurate reassembly.
Mechanical cleaning demands strict adherence to safety rules. Never use steel tools or wire brushes on polished tooling. Steel scratches the surface, causing permanent flow defects. Use brass scrapers and copper mesh to remove degraded polymer safely. Apply specialized polishing compounds to clean the metal without altering the tooling's precise dimensional tolerances. Even a microscopic scratch on the die lip will transfer directly to the extruded parison.
Apply a generous coating of high-temperature release agent before scraping to loosen stubborn polymer.
Use brass putty knives to gently lift thick layers of plastic away from the steel.
Scrub the remaining residue with copper gauze pads soaked in a mild, non-abrasive solvent.
Finish the surface by buffing it with a clean cotton rag and ultra-fine diamond polishing paste.
Reassembly requires precision, alignment, and proper torquing. Reinstall the die head onto the extruder barrel carefully. Ensure precise alignment to prevent polymer leakage. Always replace worn seals and gaskets during reassembly. Reusing old copper seals guarantees a blowout under high pressure. Use a torque-wrench sequence at operating temperatures. Uneven torquing leads to uneven parison thickness and continuous part defects. Follow a star pattern when tightening bolts to distribute the load evenly across the flange.
This method involves high labor costs and extended downtime. However, it provides the benefit of a thorough, visual inspection of internal components. Manual teardowns are necessary for periodic maintenance. They are highly inefficient for daily changeovers. You must weigh the labor investment against the necessity of a perfectly clean die head. Dropping or scoring expensive tooling components is a major risk. Mitigate this by using proper cranes and hoists. Set up dedicated staging areas covered with wooden or rubber mats. Never place steel tooling directly on concrete floors. Rigorous technician training ensures your team handles these heavy, delicate components with the necessary care.
Thermal and chemical cleaning systems provide a total overhaul. This method recovers heavily degraded or complex accumulator heads. Off-line thermal cleaning utilizes extreme heat or chemical reactions to strip away years of baked-on carbon. Fluidized beds use heated aluminum oxide to scrub the parts. Burn-off ovens use controlled pyrolysis to turn polymer into ash. Salt baths use chemical oxidation to strip carbon down to bare metal.
Thermal Method | Process Description | Advantages | Disadvantages |
|---|---|---|---|
Fluidized Bed | Parts submerged in bubbling, heated aluminum oxide sand | Even heat distribution, fast cleaning cycle | Media can get trapped in small tapped holes |
Burn-Off Oven | Controlled vacuum pyrolysis turns plastic to ash | Handles very large, heavy accumulator heads easily | Long cycle times, requires post-process ash washing |
Salt Bath | Submersion in molten chemical salts for rapid oxidation | Extremely fast, cleans complex internal geometries perfectly | High safety risk, requires strict environmental disposal protocols |
Post-thermal inspection is absolutely critical. You must inspect the tooling for micro-cracks after thermal cleaning. Extreme heat can stress the metal. Repolish the flow channels with ultra-fine diamond paste. This restores the low-friction surface required for an even parison drop. Skipping the polishing step guarantees flow lines in your next production run. The bare metal left behind by thermal cleaning is highly susceptible to flash rusting. You must coat the parts in a rust preventative immediately after they cool.
These systems require high capital expenditure or outsourcing costs. However, they offer unparalleled cleaning depth for severe contamination. You must consider environmental and safety compliance. Handling chemical salts requires strict safety protocols. Managing off-gassing from burn-off ovens requires proper ventilation and environmental permitting. Many facilities choose to outsource this step to specialized cleaning vendors rather than installing the equipment in-house.
Tooling exposed to excessive temperatures faces severe metallurgical risks. Annealing and warping destroy the die head completely. Mitigate this risk through strict temperature profiling. Keep all cleaning temperatures well below the steel's tempering point. Ensure even heating and cooling cycles to prevent thermal shock and dimensional distortion. Always consult the original equipment manufacturer to verify the maximum safe temperature for your specific steel alloy.
Selecting the right cleaning method requires evaluating specific conceptual trade-offs. Decision-makers must compare downtime duration, labor intensity, and risk to tooling. No single method works for every situation. You must match the cleaning strategy to your immediate production needs and the severity of the contamination. A minor color streak requires a different response than a completely carbon-locked accumulator head.
Guide your strategy by matching frequency against severity. Use purging compounds weekly for routine color changes. Schedule manual teardowns quarterly for preventative maintenance and inspection. Utilize thermal cleaning annually for total refurbishment of heavily carbonized components. This tiered approach maximizes production uptime while protecting your capital equipment. Do not wait for a catastrophic failure to implement a cleaning schedule. Proactive maintenance always costs less than reactive emergency repairs.
Frame your final decision around overall operational efficiency. Factor in lost production hours during maintenance shutdowns. Calculate the consumable costs of purging compounds and brass tools. Consider the lifespan extension of the die head. Proper maintenance delays the need for expensive tooling replacements and keeps your production lines running profitably. Train your operators to recognize the early signs of contamination so they can intervene before the problem escalates.
No single cleaning method is a silver bullet for die head maintenance. A robust operation requires a tiered approach utilizing all three methods. You must apply the right method at the appropriate stage of the production lifecycle. Audit your current scrap rates and changeover times today. Identify whether your primary bottleneck is daily inefficiency or long-term degradation.
Schedule a trial with a high-quality purging compound supplier to reduce daily changeover times.
Audit your manual cleaning toolkits immediately to ensure strict non-ferrous compliance.
Request quotes for off-site thermal cleaning services to refurbish heavily degraded accumulator heads.
Implement a standardized shutdown purging protocol to prevent oxidation during idle periods.
A: Cleaning frequency depends on production volume and material types. Use purging compounds for every color or resin change. Perform a manual teardown for inspection quarterly. Execute a full thermal cleaning annually or when severe carbonization causes persistent part defects.
A: Mechanical purging compounds use high-viscosity carriers to physically scrub carbon and residue from internal surfaces. Chemical purging compounds contain active ingredients that alter polymer viscosity and break down carbon bonds at a molecular level, requiring a soak time to work effectively.
A: No. You must never use steel tools, wire brushes, or abrasive pads on polished die head components. Steel scratches the surface, altering dimensional tolerances and causing permanent flow defects. Always use non-ferrous tools like brass scrapers and copper mesh.
A: Black specks are caused by degraded, carbonized polymer breaking loose from the internal walls of the extruder barrel or die head. This degradation occurs when resin is exposed to high temperatures for extended periods, often due to improper shutdown procedures or oxygen exposure.
A: Safely removing an accumulator head requires proper lifting equipment like overhead cranes or hoists. Disconnect all power, heaters, and sensors first. Use designated lifting rings. Lower the heavy components onto dedicated staging areas covered with wooden or rubber mats to prevent damage.
A: Salt baths are highly effective but pose risks to certain metals. The extreme heat and chemical oxidation can cause metallurgical changes, annealing, or warping if the temperature exceeds the steel's tempering point. Always verify compatibility with your specific tooling alloy before use.